Mastering Remote Access: SSH To Your Raspberry Pi Behind A Firewall Without A Mac
Imagine being able to securely access your Raspberry Pi from anywhere in the world, even when it's tucked away behind a firewall. This might sound like a dream, or perhaps a complex technical headache, especially if you're trying to avoid punching holes in your firewall or relying on a specific operating system like macOS for your client machine. Don't worry, you're not alone in facing this challenge.
This is where the challenge lies: How do you access your Raspberry Pi, securely, from the outside world, without exposing your network to potential threats by opening ports? This article delves into the core of this challenge, providing a comprehensive guide to accessing your Raspberry Pi remotely via SSH (Secure Shell) while keeping things free of charge and without needing a Mac as your connecting device.
SSH to Raspberry Pi behind a firewall without a Mac might sound daunting, but with the right steps and techniques, it’s totally doable. Today, we’ll break it down step by step so you can access your Pi securely, even when you’re miles away, using a Linux or Windows machine.
Understanding the Basics: SSH and Firewalls
What is SSH (Secure Shell)?
SSH (Secure Shell) is like a superpower for remote access. It's a cryptographic network protocol that allows you to control your Raspberry Pi from anywhere in the world over an unsecured network. It provides a secure channel over an unsecured network by using strong encryption. This means you can issue commands, transfer files, and manage your Pi as if you were sitting right in front of it, all with robust security measures in place.
The Role of Firewalls
Firewalls are essential components of network security. They act as a barrier, monitoring and controlling incoming and outgoing network traffic based on predetermined security rules. Their primary role is to protect your internal network from unauthorized access and malicious attacks from the internet. While crucial for security, firewalls also present the hurdle when you want to initiate a connection from the outside world to a device like your Raspberry Pi sitting inside your home network.
Traditionally, accessing devices behind a firewall involved "port forwarding," which means configuring your router to direct specific incoming traffic from the internet to a particular device on your internal network. However, this typically involves opening specific ports, which can expose your network to potential threats if not configured meticulously. Accessing your Raspberry Pi remotely via SSH without port forwarding is not only possible but also highly practical for many users seeking enhanced security.
The Challenge: SSH to Raspberry Pi Behind a Firewall Without Port Forwarding
The core problem we're addressing is how to establish a secure SSH connection to your Raspberry Pi when it's behind a firewall, without resorting to the potentially risky practice of port forwarding. Furthermore, we're focusing on solutions that don't require you to use a macOS computer as your client machine. Accessing your Raspberry Pi via SSH behind a firewall without Windows (meaning you can use Linux or other non-Mac/non-Windows systems) is entirely feasible with the right tools and techniques.
Many users, whether they're tech enthusiasts or professional developers, need this flexibility. They want to manage their home automation projects, personal servers, or IoT devices without being tied to a specific location or operating system. This guide aims to provide that freedom.
Prerequisites: Getting Your Raspberry Pi Ready
Before we dive into the remote access methods, your Raspberry Pi needs to be set up and ready to accept SSH connections. After setting up your Raspberry Pi, you may not need a display for it, as all configuration can be done via SSH.
- Enable SSH on Your Raspberry Pi:
SSH is usually disabled by default on new Raspberry Pi OS installations for security reasons. You can enable it in a few ways:
- Via Raspberry Pi Configuration Tool (GUI): If you have a monitor connected, go to `Menu > Preferences > Raspberry Pi Configuration > Interfaces` and enable SSH.
- Via `raspi-config` (Terminal): Open a terminal and type `sudo raspi-config`. Navigate to `Interface Options > SSH` and enable it.
- Via `boot` partition (Headless Setup): If setting up headless, create an empty file named `ssh` (no extension) in the `boot` partition of your SD card after flashing the OS.
- Find Your Pi’s IP Address:
Once SSH is enabled on your Raspberry Pi, the next step is to connect to it remotely from within your local network first. Find your Pi’s IP address by entering the `ifconfig` (or `ip a`) command in the terminal, noting whether you’re on Wi-Fi (
wlan0) or Ethernet (eth0).ifconfigLook for the `inet` address under your active network interface (e.g., `wlan0` or `eth0`).
- Update Your Pi:
It's always a good practice to update your Pi's software to ensure security and stability:
sudo apt update sudo apt upgrade
Methods for Remote SSH Without Port Forwarding
Now, let's explore how to achieve secure remote SSH access to your Raspberry Pi without opening ports on your firewall. These methods are platform-agnostic on the client side, meaning you can connect from Linux, Windows, or even other Raspberry Pis.
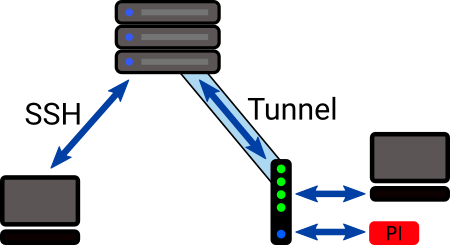
1. Reverse SSH Tunneling
Reverse SSH tunneling is an ingenious method where your Raspberry Pi initiates an SSH connection outwards to an external server (often a cheap VPS or another always-on machine you control). This creates a "tunnel" that allows you to connect back into your Pi via the external server.
How it Works:
- Your Raspberry Pi (behind the firewall) connects to a publicly accessible server (let's call it the "Jump Server").
- This connection creates a persistent SSH tunnel.
- When you want to access your Pi, you SSH into the Jump Server, and through the established tunnel, you can then connect to your Pi.
Steps (Conceptual):
On your Raspberry Pi:
ssh -N -R 2222:localhost:22 user@your_jump_server_ipThis command tells your Pi to create a reverse tunnel (`-R`) where port 2222 on the `your_jump_server_ip` maps to port 22 (SSH) on the Pi (`localhost:22`).
From your client machine (Linux, Windows via WSL/PuTTY/OpenSSH):
ssh -p 2222 user_on_pi@your_jump_server_ipThis connects you to the Jump Server on port 2222, which then forwards you to your Raspberry Pi.
Pros: Highly secure, no incoming firewall rules needed for your home network. Free if you already have a Jump Server.
Cons: Requires an external server with a public IP address. The connection needs to be kept alive (e.g., using `autossh`).
2. Virtual Private Network (VPN)
Setting up a VPN server, either on your router (if supported) or on another device within your network, allows you to create a secure, encrypted tunnel from your client device to your home network. Once connected to the VPN, your client device effectively becomes part of your home network, allowing direct SSH access to your Raspberry Pi.
How it Works:
- You set up a VPN server within your home network (e.g., on a dedicated router, another Pi, or a NAS).
- Your client device connects to this VPN server from anywhere.
- Once connected, your client device is virtually inside your home network, and you can SSH to your Raspberry Pi's local IP address.
Considerations:
This method usually requires a single port forward for the VPN server itself on your router, but it's a single, encrypted entry point for your entire network, rather than opening specific ports for each device. Popular VPN protocols include OpenVPN or WireGuard. Many modern routers support VPN server functionality.
Pros: Extremely secure, encrypts all traffic, provides full access to your home network resources. Can be free if self-hosted.
Cons: Requires initial setup of a VPN server, might require a single port forward for the VPN server itself.
3. Cloud-Based SSH Services / IoT Platforms
Several cloud-based services and IoT platforms are designed to facilitate remote access to devices behind firewalls. These services act as intermediaries: your Raspberry Pi connects to their cloud infrastructure, and then you connect to the same infrastructure to access your Pi. They handle the complexities of NAT traversal and firewall bypass.
How it Works:
- You sign up for a service (e.g., Remote.It, ngrok, Dataplicity, Tailscale).
- You install their client software on your Raspberry Pi.
- The Pi establishes an outbound connection to the service's cloud.
- You use the service's web interface or local client on your non-Mac computer to connect to your Pi through their cloud infrastructure.
Examples:
- Remote.It: Provides a service that allows you to create private network connections to your devices.
- ngrok: Creates secure tunnels to expose a local server behind a NAT or firewall to the internet. While often used for web servers, it can tunnel SSH.
- Tailscale: Builds a secure mesh network between your devices, regardless of their location or firewall. It's built on WireGuard and makes devices feel like they're on the same local network.
Pros: Often the easiest to set up, minimal technical knowledge required, handles firewall complexities automatically. Many offer free tiers for basic usage.
Cons: Relies on a third-party service (data privacy, uptime), free tiers might have limitations, some features may require a paid subscription. Be cautious about "free downloads that might" compromise security; stick to reputable services.
Security Considerations
Regardless of the method you choose, security should always be paramount. Here are some essential security considerations:
- Use Strong Passwords and SSH Keys: Always use strong, unique passwords for your Pi. Better yet, disable password authentication for SSH and rely solely on SSH key pairs for enhanced security.
- Keep Your Pi Updated: Regularly run `sudo apt update && sudo apt upgrade` to ensure your Pi's software is up-to-date with the latest security patches.
- Limit User Access: Create a dedicated user for remote access and avoid using the default `pi` user with elevated privileges.
- Configure a Firewall on Your Pi: Even though your home router has a firewall, configuring a software firewall (like `ufw`) on your Raspberry Pi itself adds another layer of defense.
- Monitor Logs: Periodically check SSH logs for unusual activity.
Why "Without Mac" Matters
The emphasis on "without Mac" in this guide highlights the versatility and accessibility of these remote SSH solutions. While macOS clients can certainly connect to a Raspberry Pi via SSH, the methods discussed here are entirely independent of the client's operating system. Whether you're using a Linux distribution (like Ubuntu, Debian, Fedora) or a Windows machine (leveraging tools like PuTTY, Windows Subsystem for Linux (WSL), or the built-in OpenSSH client in Windows 10/11), you can implement these solutions seamlessly. This ensures that accessing your Raspberry Pi remotely is an option for everyone, regardless of their preferred desktop environment.
Conclusion
Remote connecting to a Raspberry Pi behind a firewall without a Mac can seem daunting, but as we've explored, it's an entirely achievable task with the right tools and techniques. You no longer need to resort to complex port forwarding configurations that might compromise your network's security.
By the end of this article, you should have a solid understanding of how to SSH into your Raspberry Pi securely from anywhere. Whether you opt for the robust control of reverse SSH tunnels, the comprehensive security of a VPN, or the convenience of cloud-based services, the power to manage your Raspberry Pi remotely is now within your grasp, free from the constraints of your physical location or the need for a specific operating system on your client device.
This guide has provided a comprehensive overview of how to securely access your Raspberry Pi behind a firewall, focusing on methods that avoid port forwarding and are compatible with non-Mac client machines. With these insights, you can unlock the full potential of your Raspberry Pi projects, managing them with ease and confidence from anywhere in the world.
Access Raspberry Pi Behind Router or Firewall Remotely

How To Access Your Raspberry Pi Via Ssh Behind A Firewall Without

Raspberry Pi SSH: How to SSH into Raspberry Pi - YouTube
